


From time to time, I find that note-bashing is not effective, or because there is a lack of rehearsal time, I need singers to learn parts before they get to rehearsal, and to reinforce the teaching when they get home.
Of course, some people can read music and bash out notes for themselves, but much of the time I work with people who cannot read music, and need that extra help.
It is time-consuming, but sometimes necessary to produce “teach tracks”.
There are many approaches to this, for example getting someone to sing each part, or playing the notes on a piano – hammering out the part.
For me, neither my playing or my singing is accurate enough to not teach mistakes! I prefer to use the technology I have available, and I prefer to use the technology I have available.
Your mileage may vary, as they say, but I like to include two things in the teach tracks:
- The vocal part on its own.
- The part in the context of the other parts and music.
The first may be obvious – I want to teach the altos how to sing a tricky line, it makes sense to isolate that line. But the second, the context, is often missing – is there a lead-in to the line sung by another part (or cued on another instrument?), how long is the gap between phrases?
My approach is:
- Prepare a score with each part in a separate voice or track.
- Copy each voice line to a suitable instrument track.
- Record each (instrumental) voice track separately to an audio file.
- Reord the full voice (choir)Â part and any additional accompaniment to a separate audio file.
- In an digital audio workstation (DAW), combine one voice line with the accompaniment: pan the voice line hard right, and the accompaniment hard left.
- Save as an MP3 file.
- Repeat the previous two steps for each of the other voices.
- Make these MP3 files available.
I am going to use the opening phrase of Bach’s arrangement of the chorale How brightly shines the morning star as an example.
Prepare the source score
I use Sibelius, but you can use your favourite notation editor or DAW or whatever. We need to be able to isolate each voice (soprano, alto, tenor, bass), so first of all make sure that where notes are shared (for example the tenor/bass D on beat 2 in bar 2) they are repeated on all the parts. I usually write each part out on a separate stave, however often the starting point has two or more parts on a stave. As long as we can separate out the parts, it doesn’t matter too much.
Sometimes, we may split a part, for example sopranos are normally together, but for a few notes or a single phrase we may split them – be aware of this. You need to ensure that you have a complete soprano 1 and complete soprano 2 line. Rather than make the notation messy, create two staves. Write out soprano 1 part, copy into soprano 2 part, then make necessary changes.

For convenience, I have colour coded the voices.
Create extra instrument lines
I find that instruments that are rich in overtones and have a definite attack work well, for example Clarinet, Cor Anglais, Tenor Sax, and Bassoon. Make sure you use an instrument that has a suitable range for the part. I tend not to use piano, because although the attack is fine, the sound doesn’t sustain well – woodwind and brass instruments are better. I do not use the choir (oohs or ahhs) voices for the individual lines because the attack is often difficult to hear, although I include a choir as part of the background track.
In Sibelius, use Add or Remove Instruments to insert new instruments.

You may find it convenient to change the order – I prefer to have Clarinet for the soprano line and Cor Anglais for alto line, so move the Clarinet to the top of the list.
Now, copy each voice to the appropriate instrument track.

In Sibelius, you can separate voice 1 from voice 2 using a filter.
There is a subtle difference between Voice 1 and Voice 1 Only, but it probably doesn’t matter. You can also use the shortcut.
The score now looks like this:

It really doesn’t matter that the notes are in voice 2 in the Cor Anglais and Bassoon parts. The only neatening I did was to remove the lyrics, but that’s not important either.
You may want to save your work frequently!
Record tracks
This is a bit of a fiddle to get round a problem in Sibelius. For some reason, the mixer doesn’t pan tracks fully left and right even if you tell it to! Why do you need to do this?
The idea is that in the right channel you hear just the part. In the left channel you get everything else (the rest of the choir, accompaniment, and maybe other instrument lines). When the singer wants to just hear your part, they only need the right headphone – gives the user some measure of choice.
You need to view the mixer (type M in Sibelius).

This allows you to mute tracks and groups of tracks. For example you can mute the instrument parts and just have the choir together.
Tip: You may want to include the metronome click on each track if the rhythm is complex or there are a lot of long gaps. If you do this, you probably don’t need to include it in the context (everything else) track.
We are going to export five files in our example:
- Clarinet solo (soprano part).
- Cor Anglais solo (alto part).
- Tenor Sax solo (tenor part).
- Bassoon solo (bass part).
- Everything else (the choir / context).
If you have extra vocal solos, or split parts, you may need to export more files.
Hint: Before you export a track, listen to make sure it is what you expect. It is frustrating at the very least to end up with a silent audio file because you forgot to un-mute a track, or because you switched from full score to a part view.

Sibelius 7Â audio export page.
A couple of things to note:
- Remember to export from the same point every time – the start is a very good idea.
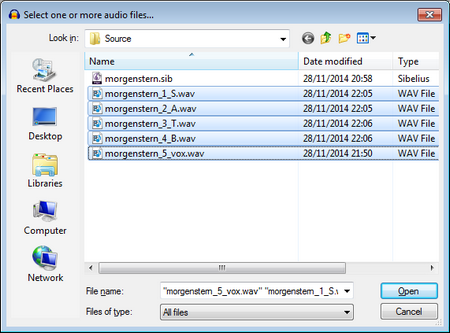
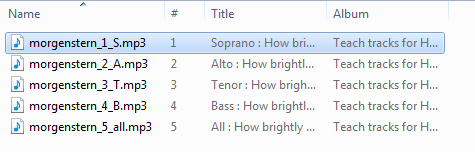
- Use a naming convention that lets you sort the tracks conveniently. This will save frustration later! I use project_number_part; the project is the name of the score, the number 1..n (or 01..nn if more than 9 parts) will help sort the parts in a sensible order (I use 1 for the topmost part, for example soprano, 2 alto, and so on), and the part is just a reminder (s, a, t, b, all, s1, s2, solo and so on)
Rinse and repeat for each part, plus an extra one for the “everything else” track.
At this point, we have a set of files, each of which contains a single track (or the context track – here named vox):

Time to head over to the audio editing program.
Create the MP3 teach tracks
The idea is that we want to combine a solo track (panned hard right) with the context track (panned hard left). I’ve used Audacity in this example. It is free and does the job well. (In practice I use other software, but maybe I don’t need to!) To save a few operations, you can immport all the tracks together, then mute the ones you are not working with.
Start Audacity
Import the tracks – sorted by name.
This lays the tracks in order in the workspace.
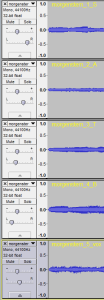
By the way, in the examples, I’ve converted the tracks to mono just to reduce visual clutter. You don’t need to do that.

Start of by muting all of the solo line tracks and panning them to the right. Pan the context (vox) track hard left. The waveform display is grey for muted tracks and blue for active tracks.
Then starting from the top:
- Un-mute one track.
- Press the play button to listen to the track and make sure it is ok.
- Choose File > Export to export the track as an MP3
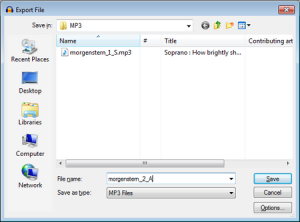
- Don’t forget to change the filename which part you are working on!
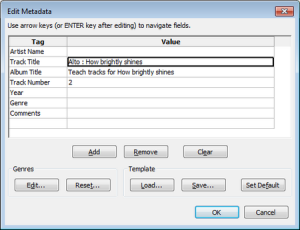
- Since you are prompted to enter metatdata, it is good practice to include some information about the track. This is helpful in media players (like iPods and smartphones) that display track titles.
- Repeat for the next track until you have a suitable set of tracks.


As a bonus, you can also make a combined track
- Unmute all the parts.
- Pan each part to a different position – put the context track in the centre.
- Export this track as before.

We are just about done! We now have a set of MP3 files that can be sent to the singers, or burned onto a CD or whatever. Personally, I drop them into Dropbox and share the link.
Although there are a lot of steps here, and this is a long post, it doesn’t take too long in practice. The main thing is preparation and planning.